Introducing the AlphaSOC Cribl Dashboard
The AlphaSOC for Cribl Search pack brings OCSF detection findings into a purpose-built dashboard for triage, entity analysis, and raw event inspection.
When a SOC analyst opens their tooling in the morning, the first question is always the same: where do I start? Without a clear entry point, that question costs time: pivoting between tools, rebuilding context, and sometimes missing the escalation that needed to happen an hour earlier. AlphaSOC generates OCSF detection findings across cloud, application, network, and endpoint telemetry. The AlphaSOC for Cribl Search pack puts those findings into a structured summary dashboard where you can orient yourself before investigation. Filter by severity, review affected entities, inspect observables, and identify which findings warrant a deeper look in Cribl Search.
What the Pack Provides
The pack ships with a single dashboard built on top of AlphaSOC's OCSF Detection Finding schema. It is available at packs.cribl.io and installs through the standard Cribl pack process.
The dashboard is a read-only summary view. It gives you filters, counters, charts, and tables to orient your triage. To investigate a specific entity or finding more deeply, move to Cribl Search where you can query the dataset directly.
The dashboard ships with a built-in demo dataset that loads automatically on first open. Everything in the triage walkthrough below is visible against that dataset before you connect a single live source.
Summary Counters and Timeline
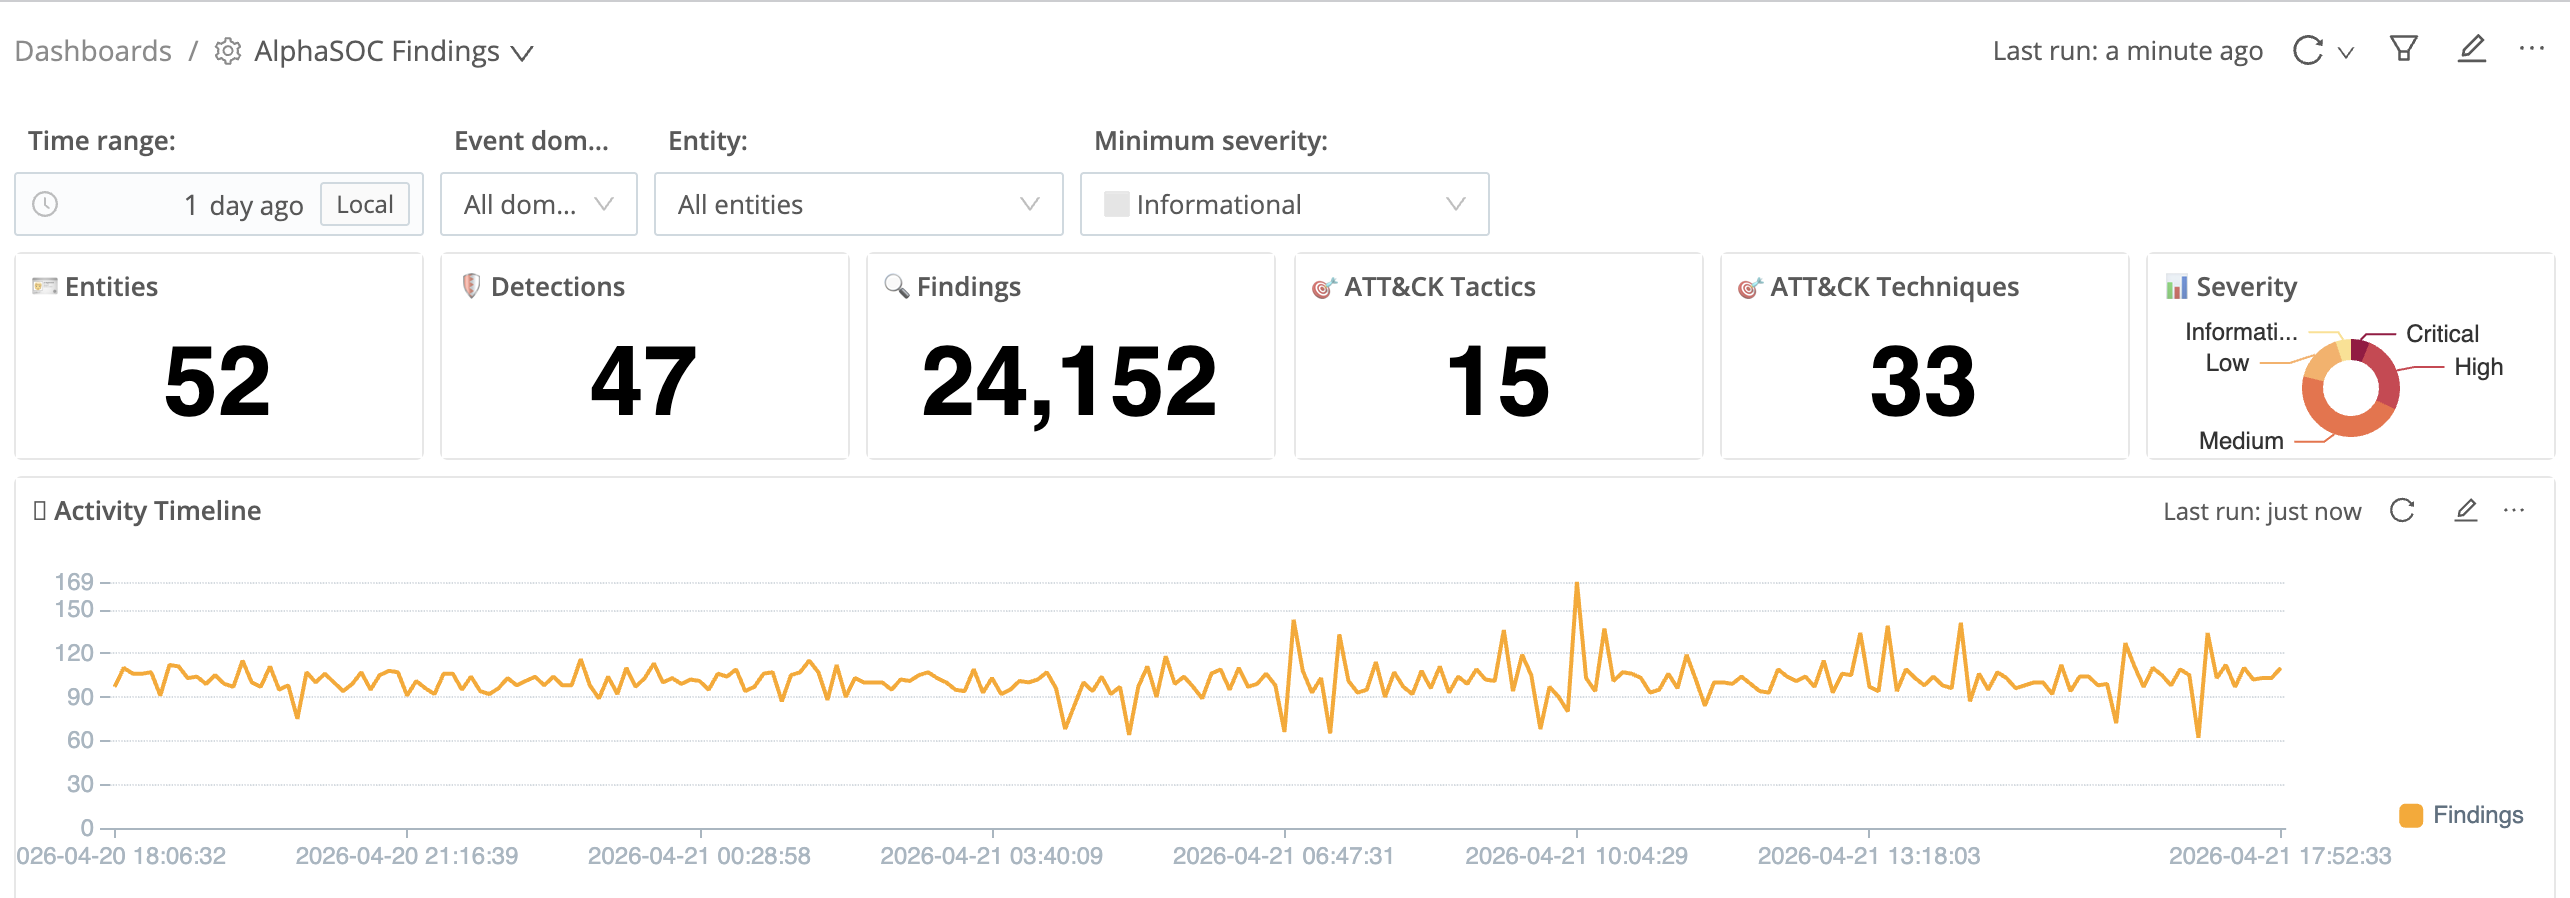
Five counters sit at the top of the dashboard: Entities, Detections, Findings, ATT&CK Tactics, and ATT&CK Techniques. These give you an immediate read on scope before you look at a single row. A wide spread across many ATT&CK tactics tells you activity is not confined to a single attack phase; a high finding count concentrated in a handful of tactics points to a more focused incident.
The Severity donut chart sits alongside the counters and shows the balance between Critical, High, Medium, Low, and Informational findings. A large Critical and High slice means your triage queue is heavy; a mostly Informational chart indicates routine noise with a smaller high-confidence signal underneath.
The Activity Timeline plots finding volume over time. A sharp increase outside any known maintenance or deployment window tells you where to prioritize investigation effort.
Findings Table
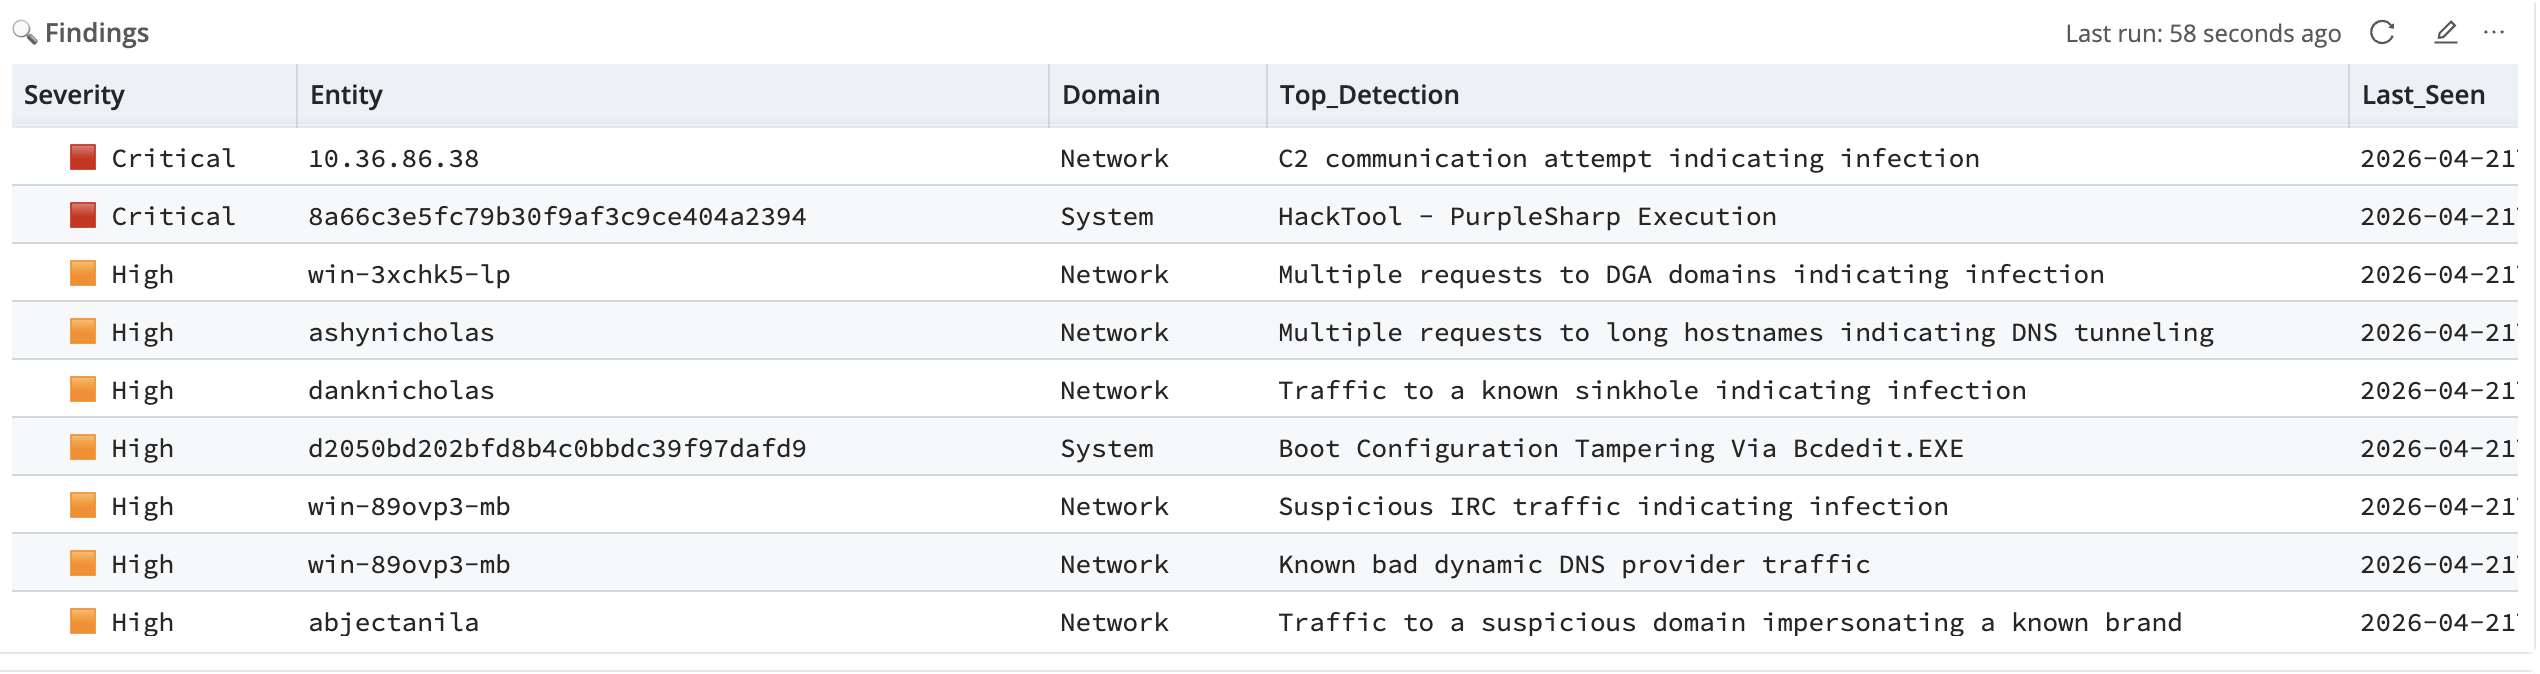
The Findings table is the primary triage surface. Each row represents an aggregated finding for a unique combination of severity, entity, event domain, and top detection rule. A single entity may have multiple detection rules contributing to its row; the Top Detection column shows the highest-priority rule that fired.
Sort by severity, then by finding count: the top rows are your starting queue. A Critical row whose Top Detection names C2 communication or a known attack tool is your first stop. Entity naming carries information here too: a hash-format name points to a container, ephemeral workload, or managed device rather than a named host, which shapes how you scope the investigation from the outset.
Observables Table
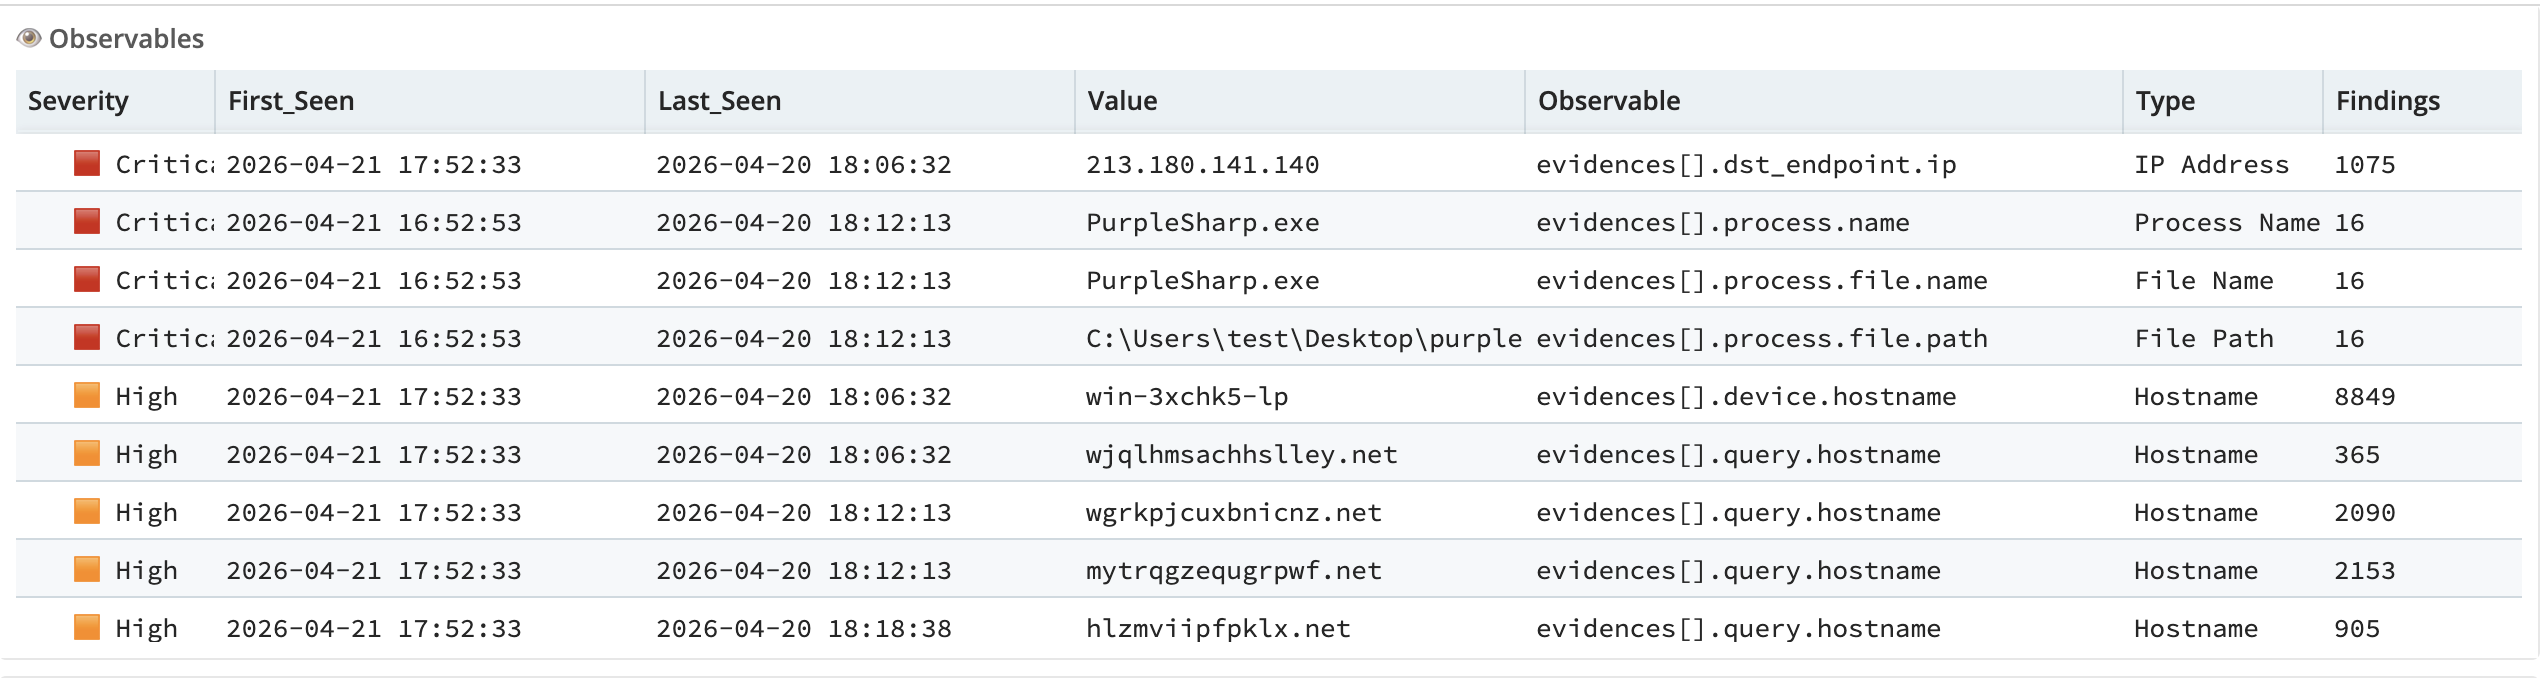
The Observables table surfaces every indicator extracted from the underlying OCSF detection findings: external IP addresses, domains, hostnames, process names, file paths, ports, and other artifacts. It covers both external infrastructure (destination IPs, queried domains) and execution artifacts (process names, file paths). Each row shows the observable type, its value, the severity of the finding it came from, and the time window in which it was seen.
Sort by severity and work down from the top. A high-volume external IP or domain at Critical severity is the first indicator to submit to threat intelligence or block at the perimeter. Execution artifacts behave differently: a known attack tool appearing as a process name confirms a detection is not a false positive and tells you which host to isolate. For any indicator worth pursuing, pivot into Cribl Search to query its full traffic or execution history.
Detections Table
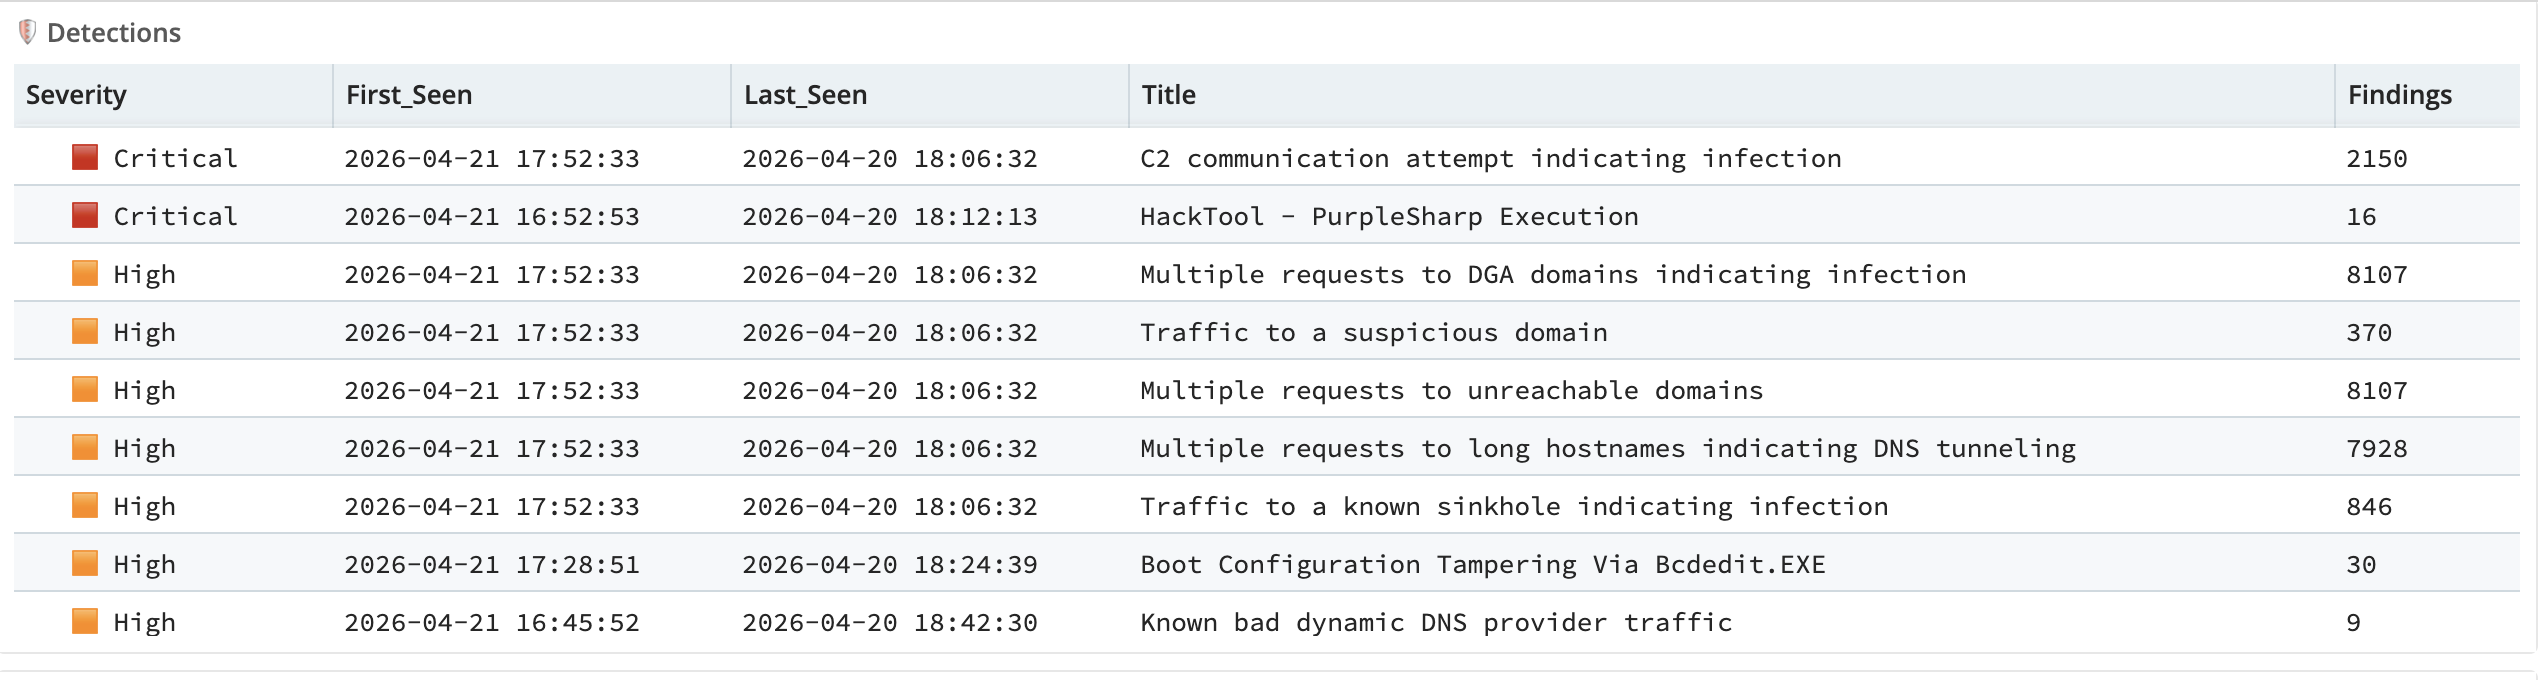
Where the Findings table aggregates by entity, the Detections table inverts the view: each detection rule is listed separately, with its finding count aggregated across all entities that triggered it. This lets you see which rules are generating the most signal across your environment, independent of which specific entity is responsible.
The two Critical rules, C2 communication attempt indicating infection and HackTool - PurpleSharp Execution, call for different responses. The first is persistent outbound communication to a known-bad destination; the second is a single targeted execution event. Volume tells you which is which.
The High severity rules cluster around covert channels: Multiple requests to DGA domains indicating infection, Multiple requests to long hostnames indicating DNS tunneling, and Traffic to a known sinkhole indicating infection all point to compromised endpoints. Boot Configuration Tampering Via Bcdedit.EXE is a separate thread: ransomware precursor activity.
A rule appearing in your environment for the first time warrants closer inspection regardless of volume. Novelty is its own signal.
Entities Table
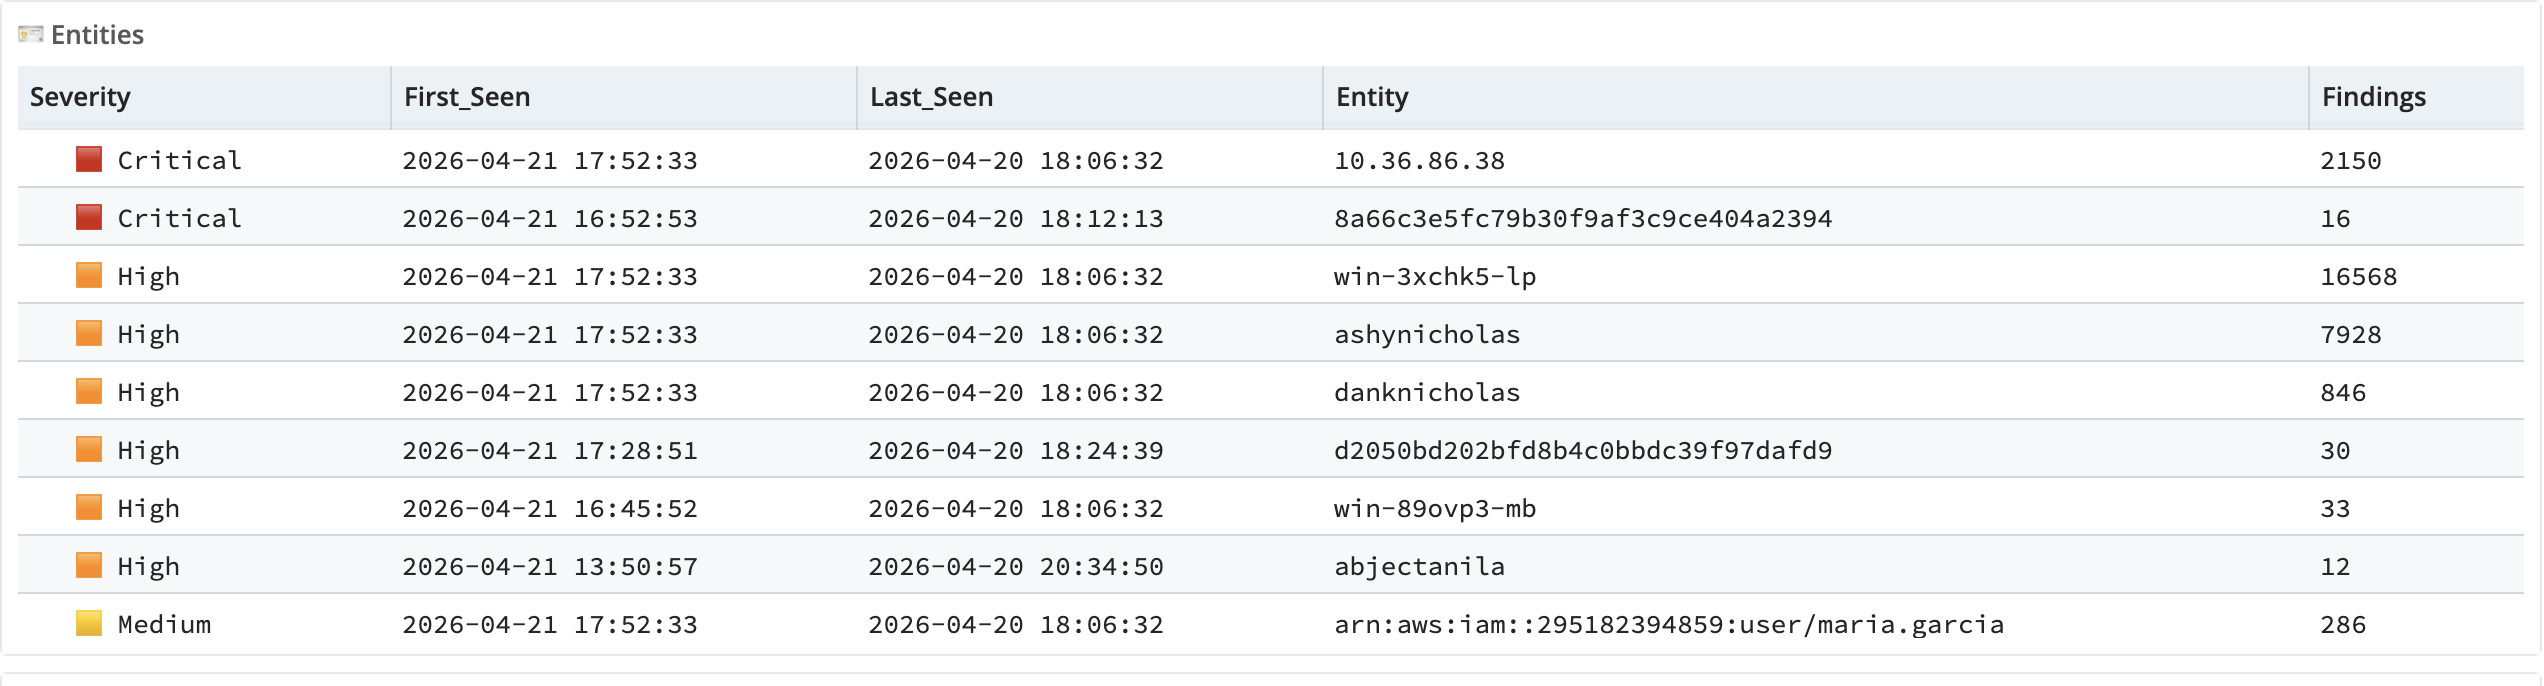
The Entities table focuses on your internal assets: the users, hosts, and workloads that appear most frequently across findings. Unlike the Observables table, which includes external indicators such as destination IPs and queried domains, the Entities table is scoped to the actor side: the identities and devices in your environment generating the activity.
Sort by finding count to see which internal assets are most active. A high-volume entity at Critical or High severity is a candidate for isolation or deeper review; a low-volume Critical entity points to a precise, targeted detection worth confirming. Entity naming itself carries information: an ARN identifies an AWS IAM identity, a hash-format name a container or managed workload, and a conventional hostname a named device. When two entities surface together at the same severity in the same event domain, cross-reference the Detections table, since similar timing across different techniques can indicate coordinated activity or shared infrastructure.
Raw Events

The Raw panel is an expandable surface in the dashboard. Each row is a complete OCSF finding event in AlphaSOC format. Expanding a row exposes the full JSON structure: the detection rule that fired, the MITRE ATT&CK tactic and technique, the evidence records including source and destination endpoints, and the timestamps.
Expanding a row surfaces the underlying evidence behind a detection. If you need to copy a specific event into another tool, extract a field value for a SOAR playbook, or verify the exact evidence behind a detection, this is where you go. For anything beyond field-level inspection (querying patterns over time, pivoting to related events, building a timeline), take the entity or indicator into Cribl Search directly.
Dashboard Filters
Four inputs at the top of the dashboard control the scope of every panel simultaneously:
- Time range - standard relative or absolute time picker
- Event domain - filter to Application, Identity, Network, System, or all domains
- Entity - filter to a specific user or device; the list is populated dynamically from your data
- Minimum severity - set a floor to suppress lower-severity noise during focused investigations
Changes to any filter propagate to all panels instantly. Set the domain to Network and the minimum severity to High, and every panel updates to show only network findings at High severity or above. This is the fastest way to scope what you are looking at before moving to Cribl Search for deeper work.
A Typical Triage Workflow
Walking through the dashboard from first open:
-
Check the summary counters. The finding count and ATT&CK tactic spread tell you whether you are dealing with a broad incident or a focused one: a wide tactic spread means multiple attack phases are represented. Set your time range to cover the full available window before filtering anything down.
-
Scan the Activity Timeline for spikes outside your known baseline. A sharp increase in the early hours, absent from the previous night, is worth pulling on before you look at anything else.
-
Sort the Findings table by severity, then by finding count. The Critical rows are your lead. Pay attention to the distinction between high-volume Critical findings (sustained activity over time) and low-volume Critical findings (a precise detection on a single event). Both are urgent, but they point to different investigation paths.
-
Cross-reference the Detections table to understand what each entity's total finding count is composed of. An entity at High with thousands of findings may be dominated by a single noisy rule, or it may span multiple distinct detection categories. The Detections table shows the breakdown and flags any rule appearing for the first time.
-
Open the Observables table and filter to Critical and High severity. External IP addresses, suspicious hostnames, and process names at Critical severity are the indicators to take to threat intelligence or submit to your SOAR. A known attack tool appearing as a process name observable is confirmation the detection is not a false positive.
-
For field-level detail on a specific finding, expand a row in the Raw panel. For anything requiring a query across your dataset (full event history for an entity, traffic patterns to a suspicious domain, timeline reconstruction), move to Cribl Search with the entity name or indicator as your starting point.
Getting Started
Prerequisites
Before installing the pack, confirm the following:
- Cribl Search is running (cloud or on-premise). The dashboard is a Cribl Search artifact and requires access to the Cribl Search UI.
- AlphaSOC OCSF detection findings are flowing into a Cribl Lake dataset. See the Cribl Stream integration guide for setup.
- You have pack installation permissions in your Cribl environment. This is a standard Cribl permission; confirm with your Cribl administrator if unsure.
If you do not yet have findings in a Lake dataset, the demo dataset loads automatically on first open. The triage workflow above is fully navigable against that demo data before you connect any live source.
Install the pack
Navigate to the Cribl Packs Dispensary and search for AlphaSOC or go directly to packs.cribl.io/packs/cc-search-alphasoc. Install using the standard pack process.
Connect your dataset
By default, the dashboard renders the demo dataset. To point it at your live findings, switch the Dataset input in the filter bar to your Cribl Lake dataset containing AlphaSOC OCSF detection findings. Full step-by-step instructions are in the AlphaSOC Cribl integration documentation.
If your findings are arriving via the AlphaSOC REST Collector configured in Cribl Stream and routed to Lake, they are already in the correct format.
Verify the connection
After switching to your dataset, check the five summary counters at the top of the dashboard. If Entities, Detections, and Findings all show non-zero values for your chosen time range, the dashboard is reading your data correctly. If the counters show zero, confirm the time range covers a period when AlphaSOC was actively generating findings and verify the dataset name matches exactly.
What Comes Next
The AlphaSOC tile is now available in Cribl Stream. It provides a guided setup flow for routing findings to Cribl Lake directly within the Cribl UI, replacing the manual Cribl Stream configuration described above.
Install the pack, open the demo dataset, and work through the triage workflow above. When you are ready to connect your own environment, the documentation below covers the full setup.
Learn More
For complete setup details, see the AlphaSOC documentation:
For questions or issues, contact support@alphasoc.com.